Fluffy Japanese Soufflé Pancakes- Easy Recipe
Fluffy Japanese Soufflé Pancakes are more than just breakfast; they are a cloud-like dream made edible. Have you ever seen those impossibly tall, jiggly pancakes on your feed and wondered how they achieve such an ethereal texture? Well, wonder no more! We’re diving deep into the magic of creating these delightful treats right in your own kitchen. The reason these Fluffy Japanese Soufflé Pancakes have taken the culinary world by storm is their astonishing lightness and delicate sweetness, a stark contrast to the dense, often heavy pancakes we’re used to. What makes them so special? It’s all in the technique: a meticulously whipped egg white meringue folded into a light batter, then cooked low and slow with a touch of steam. Prepare yourself for a truly unique breakfast experience that will have you feeling like you’re floating on air with every single bite.
Fluffy Japanese Soufflé Pancakes: A Cloud-Like Breakfast Dream
There’s something undeniably magical about Japanese soufflé pancakes. They’re not just pancakes; they’re edible clouds, impossibly light and airy, with a delicate sweetness that melts in your mouth. If you’ve ever admired those gravity-defying stacks on your social media feed and thought, “I could never make that,” think again! With a few simple techniques and the right ingredients, you can bring this restaurant-quality treat into your own kitchen. Get ready to impress yourself and anyone lucky enough to share these with you.
Ingredients:
Whipping Up the Magic: Step-by-Step Instructions
The secret to these incredibly fluffy pancakes lies in creating a stable meringue and gently folding it into the batter. Don’t be intimidated; it’s a straightforward process that yields spectacular results.
Step 1: Prepare the Wet and Dry Ingredients
First things first, let’s get our ingredients organized. In a medium bowl, whisk together the two egg yolks, milk, vanilla extract, and the optional lemon zest. This mixture will form the base of our pancake batter. In a separate, smaller bowl, whisk together the all-purpose flour and baking powder. It’s really important to properly measure your flour by spooning it into the measuring cup and leveling it off with a straight edge. This prevents you from adding too much flour, which can make your pancakes dense.
Step 2: Create the Meringue: The Key to Fluffiness
Now for the star of the show! In a clean, dry bowl (any trace of grease will prevent your egg whites from whipping properly), add the two egg whites. You can use a hand mixer or a stand mixer for this. Begin extract whipping the egg whites on medium speed until they become foamy. This is where the white vinegar or lemon juice comes in. Add the ½ teaspoon of white vinegar or lemon juice to the egg whites. This acidic ingredient helps to stabilize the protein structure of the egg whites, making them more robust and easier to whip into a stable meringue. Continue whipping, and gradually add 1 tablespoon of the granulated sugar, one teaspoon at a time, while the mixer is running. Once all the sugar is added, increase the speed to high and continue whipping until stiff peaks form. This means that when you lift the whisk, the egg whites will stand up straight and hold their shape. This fluffy meringue is what will give our pancakes their incredible lift and airy texture.
Step 3: Combine the Batter and Meringue
Now it’s time to bring everything together. Add the flour and baking powder mixture to the egg yolk mixture and whisk until just combined and smooth. Don’t overmix at this stage; we just want to incorporate the dry ingredients. Gently take about one-third of your stiffly whipped meringue and fold it into the batter using a spatula. Use a gentle folding motion, scooping from the bottom of the bowl and bringin extractg it up and over the meringue, turning the bowl as you go. The goal here is to lighten the batter without deflating the precious air we’ve incorporated into the meringue. Once this first portion is mostly incorporated, gently fold in the remaining meringue in two more additions until just combined. You should still see a few small streaks of meringue; it’s better to slightly under-mix than over-mix and lose all that air.
Step 4: The Cooking Process: Patience is a Virtue
This is where the magic truly happens, and it requires a little patience and gentle heat. Heat a non-stick skillet or griddle over very low heat. Yes, I said very low. High heat will cook the outside too quickly, leaving the inside raw and dense. Lightly grease the pan with your neutral oil. To form the tall, impressive pancakes, we’ll be cooking them in stages. You can use a large ring mold or create your own by lining the sides of your pancakes with parchment paper cut into strips and secured with a clip. Pour about ¼ cup of batter into each mold or freehand into the pan, forming thick circles. Cover the pan with a lid or a large baking sheet to create a steamy environment, which helps them cook evenly and puff up. Cook for about 5-7 minutes on the first side, until small bubbles start to appear on the surface and the edges look set.
Step 5: Flipping and Finishing
This is the most delicate part. Carefully remove the ring mold or parchment paper. You can use a thin spatula or even a bench scraper to help you flip these delicate pancakes. Flip them gently to the other side and continue to cook, covered, for another 5-7 minutes, or until they are golden brown and cooked through. You can test for doneness by gently pressing the side of a pancake; it should spring back slightly. If they are browning too quickly, reduce the heat even further.
Step 6: Whipping the Cream and Assembling Your Masterpiece
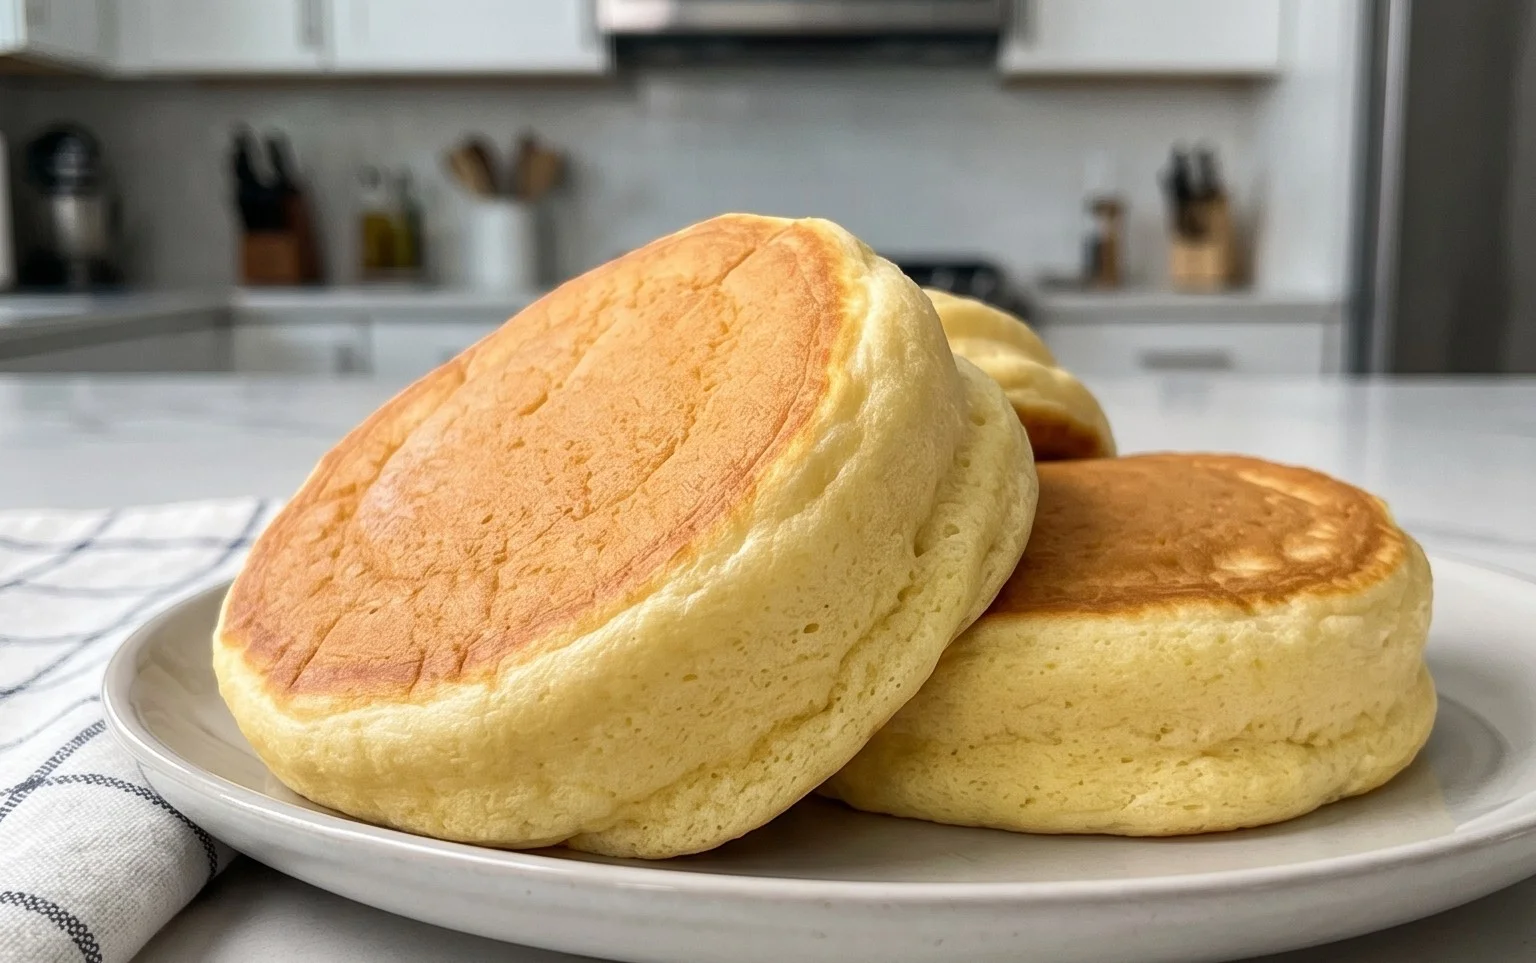
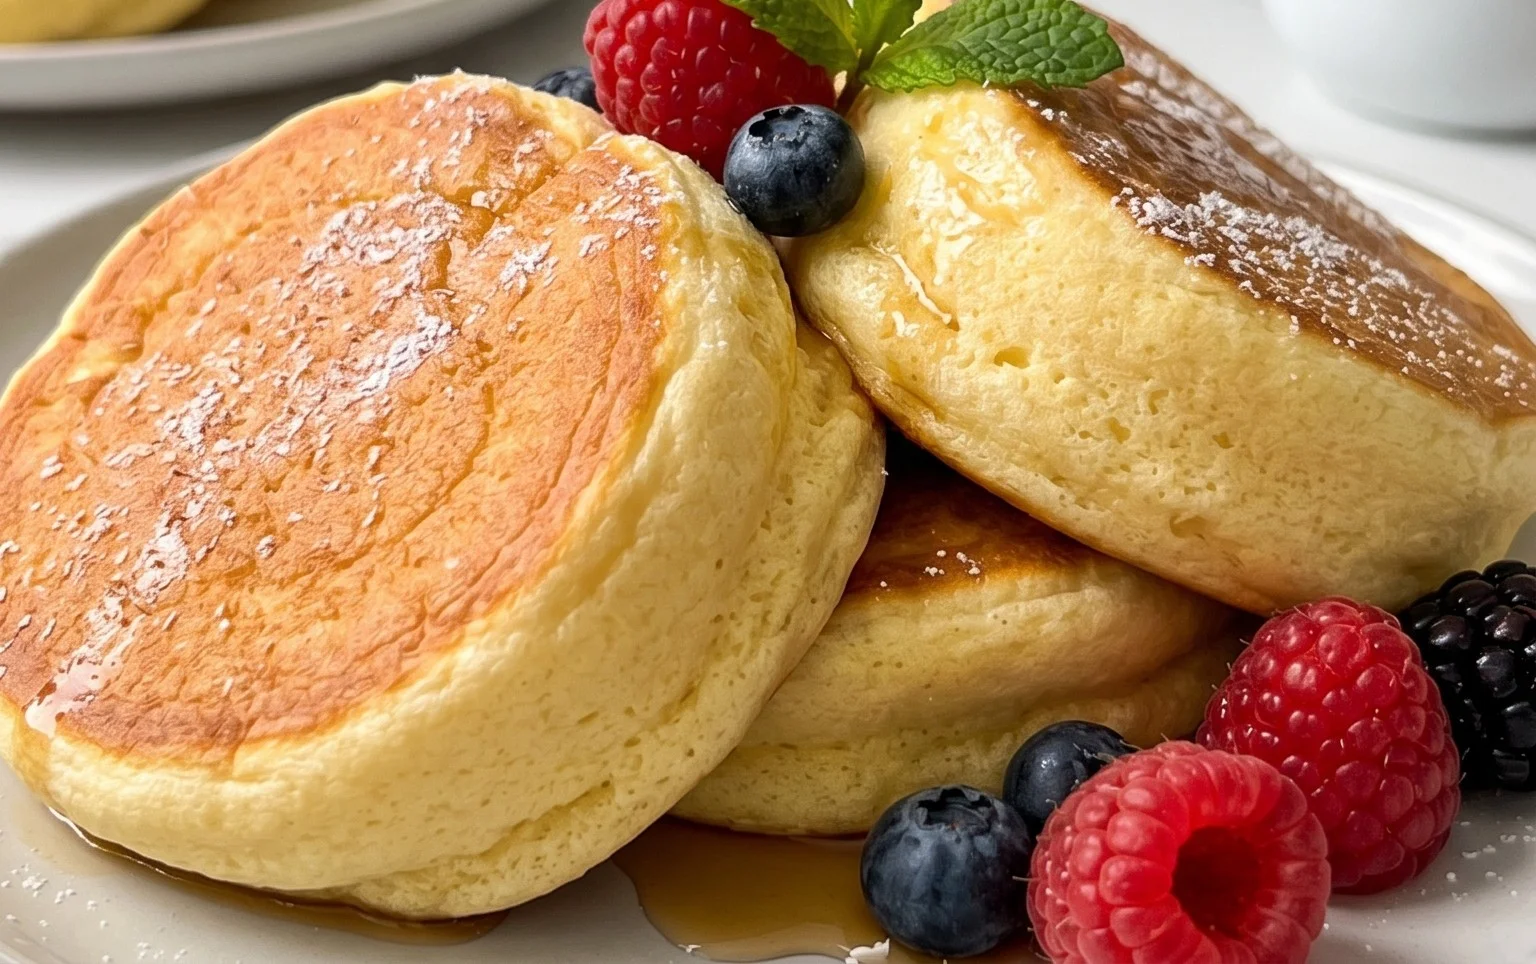
While your pancakes are cooking, let’s whip up some cream. In a chilled bowl, combine the cold heavy cream and 1 tablespoon of granulated sugar. Whip with an electric mixer until medium peaks form – you want it thick enough to hold its shape but still soft and luscious. Once your pancakes are cooked, stack them high (2-3 per serving is typical for that dramatic effect!). Dust generously with powdered sugar, dollop with your freshly whipped cream, and adorn with an assortment of fresh berries. A drizzle of maple syrup is the perfect finishing touch.
Enjoy the airy, cloud-like texture of your homemade Fluffy Japanese Soufflé Pancakes! They are a delightful way to elevate any breakfast or brunch.
Conclusion:
You’ve reached the end of our guide to creating the most delightful, fluffy Japanese soufflé pancakes! We’ve explored the techniques and ingredients that transform a simple batter into these ethereal, cloud-like treats. The magic truly lies in the whipped egg whites, which create that signature airy texture and impressive height. These pancakes aren’t just a breakfast or brunch item; they’re an experience! Their delicate sweetness and incredibly light, melt-in-your-mouth quality make them a perfect centerpiece for any special occasion or a comforting indulgence on a lazy weekend morning. They’re surprisingly forgiving, and the satisfaction of pulling them off your griddle is immense.
To elevate your fluffy Japanese soufflé pancake experience, consider a drizzle of warm maple syrup, a dusting of powdered sugar, or a dollop of fresh whipped cream. Fresh berries like strawberries or blueberries add a burst of color and flavor that beautifully complements the pancakes. For a more decadent twist, try a drizzle of chocolate sauce or a sprinkle of toasted nuts. Don’t be afraid to experiment with the batter itself; a touch of vanilla extract or even a hint of matcha powder can introduce exciting new flavor profiles. I truly encourage you to give this recipe a try. The process might seem a little daunting at first, but the results are absolutely worth it, and you’ll be rewarded with pancakes that are sure to impress.
Frequently Asked Questions:
Q: My soufflé pancakes aren’t rising very high. What could I be doing wrong?
A: The most common reason for pancakes not rising well is insufficient whipping of the egg whites. Ensure you’re whipping them to stiff peaks, meaning when you lift the whisk, the peaks stand straight up without curling. Also, be gentle when folding the egg whites into the batter to avoid deflating them. Overmixing at this stage can also be detrimental. Another factor can be the heat of your pan; it needs to be at a medium-low setting to allow the pancakes to cook through and rise without burning.
Q: Can I make the batter ahead of time?
A: It’s generally best to make the batter for fluffy Japanese soufflé pancakes just before you plan to cook them. The whipped egg whites are most stable and effective when used immediately after they’ve been folded into the batter. If left to sit for too long, the air bubbles can start to dissnon-alcoholic ipate, resulting in less fluffy pancakes.
Fluffy Japanese Soufflé Pancakes
Incredibly light and airy pancakes with a delicate, melt-in-your-mouth texture, perfect for a special breakfast or dessert.
Ingredients
-
2 large eggs, separated
-
2 tablespoons milk
-
½ teaspoon vanilla extract
-
¼ cup all-purpose flour, fluffed, spooned, and leveled
-
¼ teaspoon baking powder
-
½ teaspoon white vinegar
-
2 tablespoons granulated sugar, divided
-
Oil, for cooking
-
½ cup heavy cream, cold
-
1 tablespoon granulated sugar
-
Assorted berries
-
Powdered sugar
-
Maple syrup
Instructions
-
Step 1
In a medium bowl, whisk together the egg yolks, milk, vanilla extract, and lemon zest (if using). Gradually whisk in the flour and baking powder until just combined, being careful not to overmix. -
Step 2
In a separate, clean bowl, beat the egg whites with the white vinegar until foamy. Gradually add the 2 tablespoons of granulated sugar, one tablespoon at a time, beating until stiff, glossy peaks form. -
Step 3
Gently fold about one-third of the beaten egg whites into the yolk mixture to lighten it. Then, carefully fold in the remaining egg whites until no streaks remain, maintaining as much air as possible. -
Step 4
Heat a lightly oiled non-stick skillet or griddle over low heat. Using a ¼ cup measuring cup or a large spoon, scoop batter onto the skillet, forming thick, round pancakes. You may need to cook in batches. -
Step 5
Cover the skillet with a lid and cook for 4-5 minutes, or until bubbles appear on the surface. Carefully flip the pancakes and cook for another 4-5 minutes, or until golden brown and cooked through. -
Step 6
While the pancakes are cooking, whip the cold heavy cream with 1 tablespoon of granulated sugar until soft peaks form for the whipped cream topping. Sweetened whipped cream can be used if preferred. -
Step 7
Serve the soufflé pancakes immediately, topped with sweetened whipped cream, assorted berries, a dusting of powdered sugar, and maple syrup.
Important Information
Nutrition Facts (Per Serving)
It is important to consider this information as approximate and not to use it as definitive health advice.
Allergy Information
Please check ingredients for potential allergens and consult a health professional if in doubt.