Crispy Cottage Cheese Chips- Easy Healthy Snack
Crispy Cottage Cheese Chips are about to revolutionize your snack game! Are you tired of the same old boring chips? Do you crave something satisfyingly crunchy, yet surprisingly wholesome? Then you’ve come to the right place. I’ve discovered a truly magical way to transform humble cottage cheese into incredibly addictive crispy delights. Forget everything you thought you knew about this creamy dairy product; we’re about to unlock its hidden potential for ultimate crispiness.
Why You’ll Love These
People are raving about these Crispy Cottage Cheese Chips for so many reasons. Firstly, the texture is absolutely divine – a perfect shatter with every bite. Secondly, they’re a fantastic protein-packed alternative to traditional fried snacks, making them a guilt-free indulgence. What truly sets these apart is their incredible versatility. You can season them to perfection, making them a delightful base for dips or a standalone savory treat. Get ready to experience a snacking revelation!
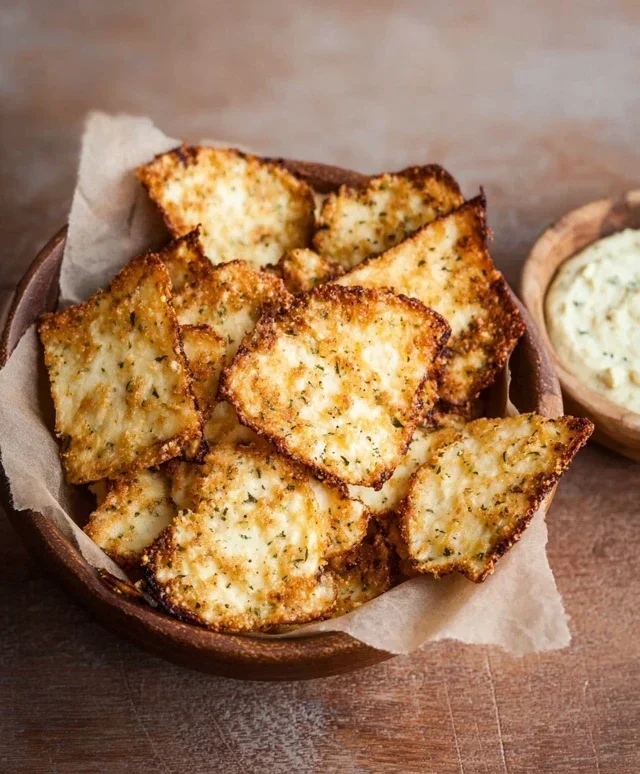
Crispy Cottage Cheese Chips
Are you looking for a healthy, protein-packed snack that’s incredibly easy to make? Look no further than these Crispy Cottage Cheese Chips! Forget those processed, often bland crackers. We’re talking about transforming simple cottage cheese into a delightfully crunchy, savory treat that you can customize with your favorite seasonings. These chips are perfect for dipping, crum extractbling over salads, or just enjoying on their own. They’re a revelation for anyone who loves a good crunch without the guilt.
The magic behind these chips lies in the drying and baking process. When cottage cheese is spread thin and baked at a moderate temperature, the moisture evaporates, leaving behind a wonderfully crispy and flavorful chip. It’s a simple science that yields delicious results. Plus, cottage cheese is a fantastic source of protein, making these chips a satisfying snack that will keep you full and energized.
Ingredients:
Cooking Instructions
Preparation is Key
The first crucial step is to ensure your cottage cheese is well-drained. This is non-negotiable for achieving maximum crispiness. I like to drain it in a fine-mesh sieve for at least 30 minutes, or even longer if I have the time. Gently pressing out any excess liquid with the back of a spoon can also help. The less moisture, the crispier your chips will be. Once drained, give the cottage cheese a quick stir to ensure a uniform consistency.
Next, let’s get our seasoning ready. In a small bowl, combine the garlic powder, onion powder, and your chosen dried herbs (if using). A little twist of salt and pepper is also a great addition. These simple seasonings provide a savory base, but feel free to experiment! Smoked paprika, a pinch of cayenne for a little heat, or even some nutritional yeast for a cheesy flavor are all fantastic options. Mix these dry ingredients thoroughly so they are evenly distributed throughout the cottage cheese.
Now, it’s time to combine the seasoned cottage cheese. Add the spice mixture to the drained cottage cheese and stir gently but thoroughly. You want to make sure every bit of the cottage cheese is coated with the seasonings. Take your time with this step to ensure an even flavor distribution in your finished chips.
Forming and Baking the Chips
Preheat your oven to 350 degrees Fahrenheit (175 degrees Celsius). Line a baking sheet with parchment paper. This is very important, as it prevents the chips from sticking and makes for easy cleanup.
Now for the shaping. This is where you determine the texture and thickness of your chips. You want to spread the seasoned cottage cheese mixture as thinly and evenly as possible onto the prepared baking sheet. Think of it like spreading frosting on a cake, but much thinner. You can use the back of a spoon or a small offset spatula for this. The thinner you spread it, the crispier your chips will become. Aim for a thickness of about 1/8 inch. If you want bite-sized chips, you can spread the mixture into one large, thin sheet and then break or cut them into pieces after baking. Alternatively, you can try to form smaller, individual chip shapes directly on the parchment paper. I find spreading a large sheet and then breaking it apart to be the easiest method for consistent results.
Once the cottage cheese is spread, give it a light spray with olive oil. This helps with browning and adds an extra layer of deliciousness. Don’t overdo it, just a light mist is perfect.
The Crucial Baking Phase
Place the baking sheet in the preheated oven. The baking time will vary depending on the thickness of your cottage cheese spread and your oven. Start by baking for about 15 to 20 minutes. You’ll want to keep a close eye on them. They are done when the edges start to turn golden brown and the center looks mostly dry.
After the initial baking time, carefully remove the baking sheet from the oven. At this point, you might notice some areas are crispier than others. If you spread one large sheet, you can gently lift and flip the entire sheet or individual chips to promote even crisping. If any spots look particularly dry and crispy, you can carefully break them off and set them aside. Continue baking for another 5 to 10 minutes, or until all the chips are golden brown and wonderfully crisp. They will continue to crisp up as they cool.
Cooling and Enjoying
Once baked to perfection, carefully remove the baking sheet from the oven. Let the chips cool completely on the baking sheet. As they cool, they will become even crispier. If you baked one large sheet, you can now break or cut it into your desired chip shapes. I like to break them into irregular, rustic pieces, but you can also use a pizza cutter or a knife to score them into squares or rectangles while they are still warm.
Store your crispy cottage cheese chips in an airtight container at room temperature for up to a week. However, I doubt they’ll last that long! They are so addictive and versatile. Enjoy them plain, or pair them with your favorite dips like salsa, guacamole, or hummus. They also make a fantastic crunchy topping for salads or soups. Experiment with different seasonings and enjoy your healthy, homemade snack!

Conclusion:
There you have it – a simple yet incredibly satisfying recipe for Crispy Cottage Cheese Chips! These aren’t just a healthy snack; they’re a delicious way to transform humble cottage cheese into something wonderfully crunchy and versatile. The beauty of this recipe lies in its simplicity and the fantastic texture you achieve. Forget greasy, store-bought alternatives; these baked wonders offer a satisfying crunch with a fraction of the fat and a boost of protein.
We’ve seen how easy it is to whip up a batch, perfect for dipping into your favorite hummus, salsa, or guacamole. Imagin extracte a movie night elevated with a bowl of these guilt-free crispy delights! Don’t be afraid to experiment with seasonings – a sprinkle of paprika, garlic powder, or even a touch of nutritional yeast can take your crispy cottage cheese chips to a whole new flavor dimension. I highly encourage you to give this recipe a try; I’m confident you’ll be amazed by how much you enjoy them!
Frequently Asked Questions:
Can I make these chips without an oven?
While baking is the method that yields the best crispiness, you might be able to achieve a somewhat crispy texture by air frying them. Experiment with a lower temperature and shorter cooking times, keeping a close eye on them to prevent burning.
What’s the best way to store leftover Crispy Cottage Cheese Chips?
For optimal crispiness, it’s best to enjoy these chips fresh. If you have leftovers, store them in an airtight container at room temperature for a day or two. However, they may lose some of their crunch over time.
Are there any dairy-free alternatives to cottage cheese for this recipe?
This specific recipe relies on the unique properties of cottage cheese for its texture and structure. While some dairy-free cottage cheese alternatives exist, they might not produce the same crispy results. You might need to explore entirely different recipes designed for vegan crispiness.
Crispy Cottage Cheese Chips
Deliciously crispy baked chips made from cottage cheese, seasoned to perfection.
Ingredients
-
1 cup cottage cheese (small curds, drained)
-
¼ teaspoon garlic powder
-
¼ teaspoon onion powder
-
½ teaspoon dried herbs (optional, like thyme or parsley)
-
Salt to taste
-
Pepper to taste
-
Olive oil spray
Instructions
-
Step 1
Preheat your oven to 375°F (190°C). Line a baking sheet with parchment paper. -
Step 2
In a bowl, combine the drained cottage cheese, garlic powder, onion powder, dried herbs (if using), salt, and pepper. -
Step 3
Spread the cottage cheese mixture thinly and evenly onto the prepared baking sheet using a spatula or the back of a spoon. Aim for a consistent thickness. -
Step 4
Lightly spray the top of the cottage cheese layer with olive oil spray. -
Step 5
Bake for 15-20 minutes, or until the edges are golden brown and the chips are firm and crispy. Keep a close eye on them as they can burn quickly. -
Step 6
Allow the chips to cool completely on the baking sheet. They will crisp up further as they cool. -
Step 7
Once cooled, break the large sheet into smaller chip-sized pieces.
Important Information
Nutrition Facts (Per Serving)
It is important to consider this information as approximate and not to use it as definitive health advice.
Allergy Information
Please check ingredients for potential allergens and consult a health professional if in doubt.