Easter Bunny Chick Cupcakes – Fun & Easy Recipe
Easter Bunny and Chick Cupcakes are the undisputed stars of any springtime celebration, and for good reason! There’s something undeniably joyous about these adorable creations that instantly brings a smile to everyone’s face, from the littlest celebrant to the seasoned baker. We all remember the magic of Easter morning, and these delightful Easter Bunny and Chick Cupcakes capture that pure, unadulterated fun. They’re not just a dessert; they’re edible works of art that transform ordinary cupcakes into miniature masterpieces. Whether you’re looking for a show-stopping centerpiece for your Easter brunch or a fun activity to enjoy with the kids, these cupcakes deliver on both taste and visual appeal. Get ready to hop into some serious baking fun as we create these utterly charming Easter Bunny and Chick Cupcakes!
Why You’ll Love Making Them:
Perfect for all ages and skill levels.
An incredibly festive and memorable treat.
Customizable to your favorite cake and frosting flavors.
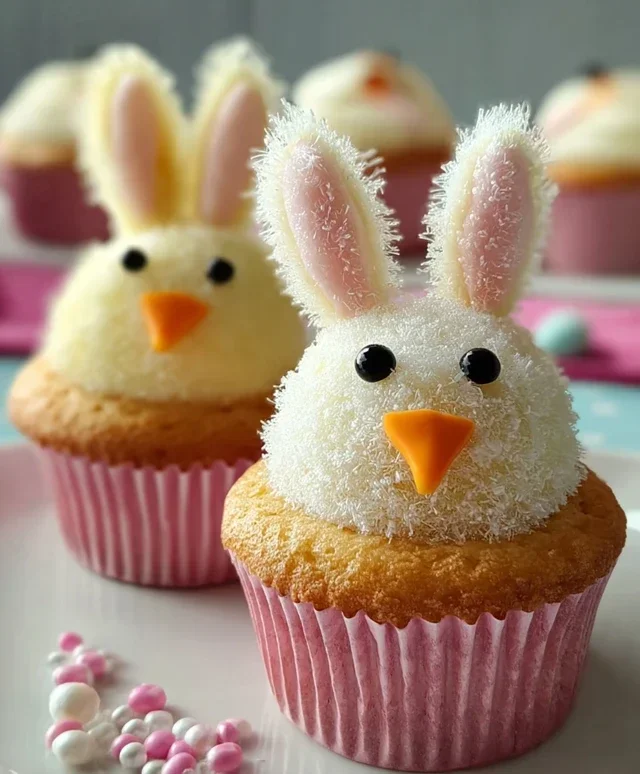
Easter Bunny and Chick Cupcakes
Get ready to hop into the Easter spirit with these absolutely adorable Easter Bunny and Chick Cupcakes! These are always a huge hit with the kids (and honestly, with us grown-ups too!). They’re surprisingly easy to make, and the festive results are guaranteed to bring smiles all around. We’ll be transforming simple vanilla cupcakes into a whole Easter basket’s worth of cuteness. Let’s gather our supplies and get started on this sweet adventure!
Ingredients:
Preparing the Cupcakes
First things first, we need our base! You can bake your favorite vanilla cupcakes from scratch or use a good quality cake mix. The recipe should yield about 24 cupcakes, which is perfect for a festive batch. Follow the instructions on your cake mix box or your chosen recipe carefully. Make sure you don’t overmix the batter, as this can lead to tough cupcakes. Once baked, let them cool completely on a wire rack. This is a crucial step – attempting to frost warm cupcakes is a recipe for a melty mess!
Making the Frosting
Next, our frosting! We’ll need a good amount of fluffy vanilla frosting for both our bunnies and chicks. If you’re making it from scratch, ensure it’s light and airy. If you’re using store-bought, a tub of creamy vanilla frosting will do just fine. We’ll be dividing this frosting and coloring a portion of it yellow for our chicks.
Decorating the Easter Bunnies
Let’s create our fluffy bunny friends!
1. Frosting the Cupcakes: Take one of your cooled vanilla cupcakes. Using a spatula or an offset spatula, spread a generous amount of white frosting all over the top of the cupcake. Aim for a smooth, even layer that covers the entire surface. This will be the base for our bunny’s fur. Don’t worry about perfection here; a slightly rustic look can actually enhance the fluffy bunny effect.
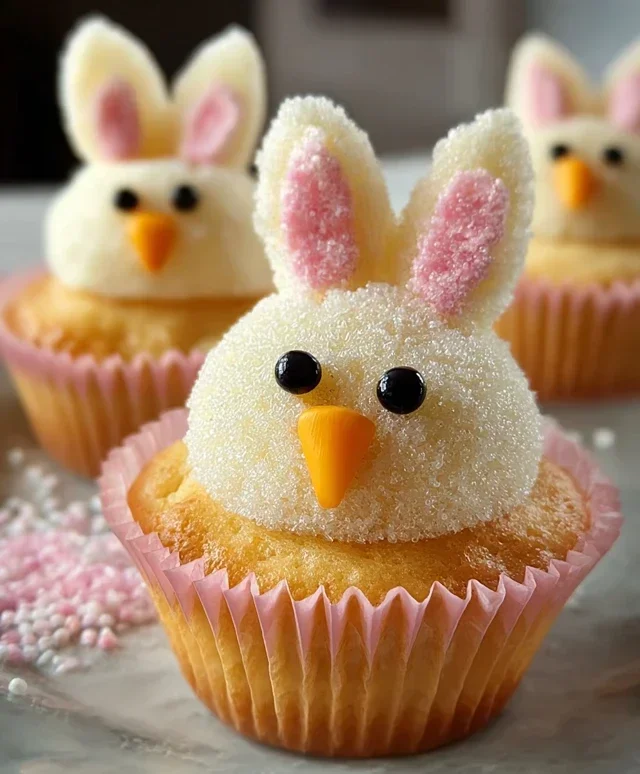
2. Creating the Bunny Ears: Now for the ears! Take two large marshmallows. With a sharp knife, carefully cut each marshmallow in half lengthwise. You’ll want to make a clean cut so you have two slightly flattened half-moon shapes. Dip the cut side of each marshmallow half into the pink colored sanding sugar until it’s well coated. These will be the inner pink parts of our bunny ears.
3. Assembling the Bunny: Gently press the sugar-coated marshmallow halves into the top of the frosted cupcake, with the pink sides facing upwards, to create the bunny’s ears. They should stand up nicely. Now, for the face. Take a pink jelly bean and press it gently into the frosting at the bottom of the cupcake for the bunny’s nose. Finally, using the black decorator icing and a fine tip, draw two little dots above the nose for the bunny’s eyes. You can also add a small smile if you like!
Decorating the Easter Chicks
Time to bring our little yellow chicks to life!
4. Coloring and Frosting the Chicks: Take a separate bowl and scoop out about half of your white frosting. Add a few drops of yellow food coloring to this portion and mix thoroughly until you achieve a vibrant, cheerful yellow. You may need to adjust the amount of food coloring to get the perfect chick yellow. Spread this yellow frosting evenly over the tops of the remaining cooled cupcakes, just like you did for the bunnies.
5. Adding Chick Features: For the chick’s beak, take an orange colored gum or an M&M and press it gently into the frosting, slightly below where the eyes will be. Next, we need to create the fluffy chick feathers. Take a few mini marshmallows and gently press them into the top of the yellow frosting around the beak area. You can slightly press them down to make them look like downy feathers. Then, using the black decorator icing, draw two small dots above the beak for the chick’s eyes. These little guys are going to look so sweet and sunny!
Finishing Touches and Serving
To add a final touch of festivity, you can sprinkle some yellow and white sprinkles around the base of your cupcakes or lightly over the bunnies’ frosting to resemble a spring meadow. Arrange your adorable Easter Bunny and Chick Cupcakes on a platter or in cupcake liners, and watch the delighted squeals erupt! These are perfect for an Easter party, a special treat for the kids, or just to brighten up your day. Enjoy your homemade Easter creations!
Conclusion:
These Easter Bunny and Chick Cupcakes are an absolute delight for any springtime celebration! They’re not just incredibly cute, but also wonderfully delicious, making them a guaranteed hit with both kids and adults. The fluffy vanilla cake combined with creamy frosting and those adorable fondant decorations creates a treat that’s as fun to make as it is to eat. I truly believe these are the perfect way to add a touch of whimsical charm to your Easter table.
Serve them as a delightful dessert after your Easter brunch, or as a special treat during an Easter egg hunt. They also make fantastic party favors or a sweet activity for a family baking session. Don’t be afraid to get creative with the decorations! You can easily switch up the colors of the frosting or add edible glitter for extra sparkle. I encourage you all to give this recipe a try – I promise you’ll have a blast bringin extractg these sweet little characters to life and will be so proud of your Easter Bunny and Chick Cupcakes!
Frequently Asked Questions:
Can I make these cupcakes ahead of time?
Absolutely! You can bake the cupcakes and let them cool completely a day in advance. Store them in an airtight container at room temperature. The frosting can also be made ahead and stored in the refrigerator; just let it come to room temperature and give it a quick whip before frosting.
What if I don’t have fondant for the decorations?
No problem at all! You can achieve a similar adorable look using buttercream frosting. For the bunny ears, pipe two small, elongated dollops of white frosting. For the chicks, use yellow frosting to pipe two fluffy tufts for the head and small dots for the eyes and beak. Get creative with your piping tips!
Are these cupcakes suitable for very young children to help make?
Yes, they are! Younger children can help with simple tasks like stirring ingredients, pouring pre-measured dry ingredients, and of course, decorating. Supervise them closely, especially with any baking steps, but they can definitely have a lot of fun adding the final touches to the Easter Bunny and Chick Cupcakes!
Easter Bunny and Chick Cupcakes
Adorable Easter cupcakes decorated to look like bunnies and chicks, perfect for spring celebrations.
Ingredients
-
1 recipe Vanilla Cupcakes (or your favorite cake mix)
-
1 recipe Fluffy Vanilla Frosting (or store-bought frosting)
-
Yellow and white sprinkles
-
Large and mini marshmallows
-
Pink colored sanding sugar
-
Black decorator icing
-
Jelly beans (pink for bunny noses)
-
Orange colored gum or M&Ms (for chick beaks)
-
Yellow food coloring (for chick frosting)
Instructions
-
Step 1
Bake vanilla cupcakes according to your recipe or cake mix instructions. Let them cool completely. -
Step 2
Prepare the frosting. For chick cupcakes, tint a portion of the frosting with yellow food coloring. Leave the rest white for bunny cupcakes. -
Step 3
For bunny cupcakes: Frost each cupcake with white frosting. Use two large marshmallows for ears, cut in half diagonally and pressed into the top. Add a pink jelly bean for the nose and use black decorator icing for eyes and whiskers. Roll the sides in white sprinkles. -
Step 4
For chick cupcakes: Frost each cupcake with yellow frosting. Place a mini marshmallow cut in half vertically for the eyes. Add an orange gum or M&M for the beak. Decorate with yellow and white sprinkles. -
Step 5
For an extra festive touch on bunny cupcakes, gently roll the sides of the frosted cupcakes in white sprinkles or pink colored sanding sugar before adding facial features. -
Step 6
Arrange the decorated cupcakes on a platter for display.
Important Information
Nutrition Facts (Per Serving)
It is important to consider this information as approximate and not to use it as definitive health advice.
Allergy Information
Please check ingredients for potential allergens and consult a health professional if in doubt.