Easy Homemade Cheez Its Recipe-Kid Approved Snack
Homemade Cheez-Its are more than just a snack; they’re a passport to pure, unadulterated cheesy joy. If you’ve ever found yourself absentmindedly reaching for that familiar red box, only to be met with disappointment when it’s empty, then this recipe is for you. We’ve all been there, craving that perfect balance of salty, savory, and utterly addictive cheesy goodness. But what if I told you that you can recreate that magic right in your own kitchen, and honestly, make it even better? That’s the beauty of homemade Cheez-Its. They offer a superior crunch, a more intense cheese flavor, and the incredible satisfaction of making them yourself. Get ready to elevate your snack game because we’re about to embark on a delicious adventure to create the ultimate Homemade Cheez-Its.
Why You’ll Love These Homemade Cheez-Its
Get Ready for the Best Snack You’ve Ever Made!
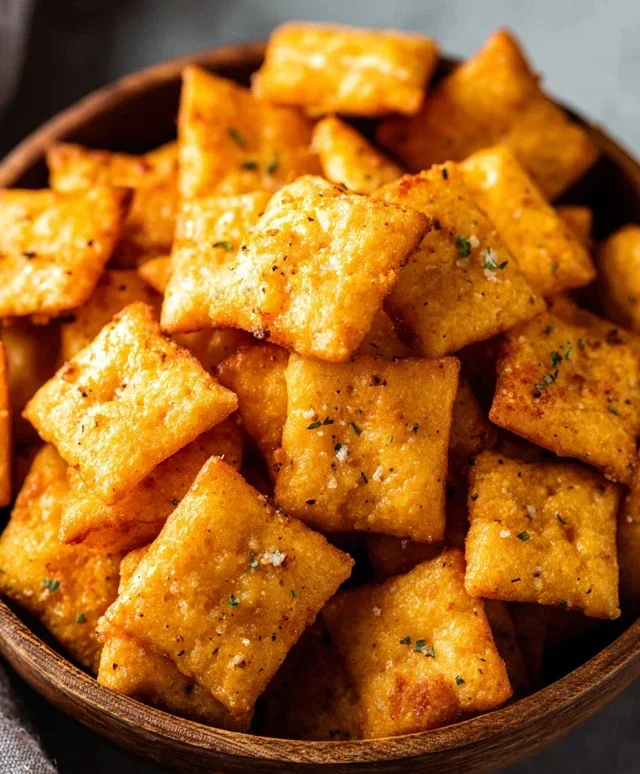
Homemade Cheez-Its
There’s something undeniably comforting about those cheesy, crunchy crackers. While the store-bought versions are a convenient snack, have you ever considered making your own? It’s surprisingly simple and incredibly rewarding. Imagin extracte biting into a perfectly crisp, intensely cheesy cracker that you made with your own two hands. The flavor is leagues beyond anything you’ll find in a box, and you have complete control over the ingredients. Forget those artificial flavors and preservatives; we’re going for pure, unadulterated cheesy goodness. This recipe is a fantastic weekend project, and the aroma that will fill your kitchen as these bake is simply heavenly. Plus, the satisfaction of pulling a tray of golden-brown, homemade Cheez-Its from the oven is unmatched. Let’s get started and unlock the secret to the ultimate homemade cheese cracker!
Ingredients:
Crafting the Cheesy Dough
The foundation of any great cracker is a well-made dough, and for our Cheez-Its, that starts with creaming together the butter and cheese. In a medium bowl, I like to combine the softened unsalted butter and the shredded sharp cheddar cheese. Using an electric mixer on medium speed is ideal here, but you can absolutely achieve this by hand with a sturdy spatula or wooden spoon if you don’t have a mixer. You’re looking for a cohesive, slightly fluffy mixture. Don’t worry if it’s not perfectly smooth; small flecks of cheese are a good thing! This initial blend ensures that the cheese is evenly distributed throughout the dough, leading to consistent flavor and texture in every bite.
Next, it’s time to incorporate the dry ingredients. To the butter and cheese mixture, I add the all-purpose flour and the 1 teaspoon of kosher salt. Again, using your mixer on low speed or a spatula, mix until the flour is just incorporated. The dough will start to look crum extractbly at this stage, which is perfectly normal. Overmixing at this point can develop the gluten too much, leading to tough crackers, so be gentle. We want tender, flaky goodness, not a workout for your jaw!
Now comes the magic ingredient that brings it all together: the cold water. Gradually add the cold water, 1 tablespoon at a time, mixing after each addition until the dough just starts to come together. You might not need all 3 tablespoons, or you might need a tiny bit more. The key is to add just enough water for the dough to form a cohesive ball. It should still be slightly crum extractbly, but it should hold together when you squeeze it. Too much water will make the dough sticky and difficult to work with, while too little will result in a dry, crum extractbly mess that won’t hold its shape. Once the dough has formed into a ball, turn it out onto a lightly floured surface.
Shaping and Scoring for Perfection
Kneading is minimal here; we’re just bringin extractg the dough together. Gently knead the dough for about 30 seconds to a minute, just until it forms a smooth, unified disc. Don’t overwork it! Now, here’s where we get those classic cracker shapes. Take your dough disc and wrap it tightly in plastic wrap. Place it in the refrigerator for at least 30 minutes, or up to an hour. This chilling time is crucial. It firms up the butter, making the dough much easier to roll out thinly and preventing it from spreading too much during baking. A cold dough is a happy dough when it comes to crackers!
Once chilled, unwrap the dough and place it on a lightly floured piece of parchment paper. This parchment paper will be your best friend for easy transfer and cleanup. Now, it’s time to roll. Using a rolling pin, I like to roll the dough out as thinly as possible, aiming for about 1/16th of an inch. The thinner you roll it, the crispier your Cheez-Its will be. Think almost paper-thin! You can do this directly on the parchment paper. If the dough feels a bit stiff, let it sit at room temperature for a few minutes to soften slightly, but don’t let it get too warm.
Once the dough is rolled out to your desired thinness, it’s time to cut them into those iconic squares. You can use a pizza cutter or a sharp knife to score the dough into small squares, roughly ½ inch by ½ inch. Don’t worry about being perfectly precise; a little variation adds to the homemade charm. Then, use a fork to lightly prick each square a few times. This step is important for preventing the crackers from puffing up too much in the oven and ensures even baking.
Baking to Golden Deliciousness
Preheat your oven to 350°F (175°C). Once your oven is preheated and your dough is scored and pricked, it’s time for the final touches. Carefully slide the parchment paper with the scored dough onto a baking sheet. Now for the finishing flourish: brush the surface of the dough with the olive oil. This adds a lovely subtle flavor and helps the salt adhere. Then, sprinkle generously with more kosher salt. This is where you can really customize the saltiness to your preference.
Carefully transfer the baking sheet to the preheated oven. Bake for 12-15 minutes, or until the edges are golden brown and the centers are firm. Keep a close eye on them, as thin crackers can go from perfectly baked to burnt very quickly. Ovens can vary, so what takes 12 minutes in mine might take 15 in yours. The goal is a beautiful golden hue all around. Once they’re done, remove them from the oven.
Cooling and Enjoying Your Creation
Allow the crackers to cool on the baking sheet for a few minutes. They will continue to crisp up as they cool. After they’ve cooled slightly, you can gently break them apart along the scored lines if they haven’t already separated during baking. Then, transfer them to a wire rack to cool completely. This ensures that air can circulate around them, promoting maximum crispiness. Once fully cooled, your homemade Cheez-Its are ready to be devoured! Store any leftovers in an airtight container at room temperature for up to a week. I doubt they’ll last that long, though! Enjoy the incredibly satisfying crunch and cheesy flavor of your homemade masterpiece.

Conclusion:
There you have it – your guide to creating irresistibly delicious Homemade Cheez Its right in your own kitchen! This recipe is fantastic because it allows you to control the ingredients, ensuring a fresh, vibrant cheese flavor that store-bought versions simply can’t match. The satisfaction of pulling a tray of perfectly golden, cheesy crackers from the oven is truly unparalleled. I encourage you to give this recipe a try; it’s easier than you might think and the results are so rewarding. They make for a wonderful snack any time of day, perfect for lunchboxes, movie nights, or just when that cheesy craving hits!
Consider serving your homemade delights alongside a hearty soup or as part of a delightful cheese board. For some fun variations, try adding a pinch of cayenne pepper for a spicy kick, or experiment with different types of cheese like smoked gouda or sharp cheddar for unique flavor profiles. You can even mix in some finely chopped herbs like chives or rosemary. Don’t be afraid to get creative and make these Homemade Cheez Its your own!
Frequently Asked Questions:
Can I use a different type of flour?
While all-purpose flour is recommended for the best texture, you could experiment with whole wheat flour for a slightly nuttier flavor and added fiber. Be aware that this might slightly alter the texture of your crackers.
My dough is too sticky, what should I do?
If your dough is too sticky, it likely needs a touch more flour. Add it in small increments, about a tablespoon at a time, until the dough is manageable and no longer sticking excessively to your hands or work surface. Be careful not to add too much, as this can make the crackers tough.
How should I store my homemade Cheez Its?
Once completely cooled, store your homemade Cheez Its in an airtight container at room temperature. They should stay fresh and crunchy for up to a week, though I doubt they’ll last that long!
Homemade Cheez-Its
Crispy, cheesy crackers that taste just like the classic snack, made from scratch.
Ingredients
-
1/4 cup unsalted butter, room temperature
-
8 oz sharp cheddar cheese, shredded
-
1 1/4 cups all-purpose flour
-
1 teaspoon kosher salt
-
2-3 tablespoons cold water
-
2 tablespoons olive oil
-
Kosher salt, for topping
Instructions
-
Step 1
In a food processor, combine the room temperature butter and shredded cheddar cheese. Process until smooth. -
Step 2
Add the all-purpose flour and 1 teaspoon of kosher salt. Pulse until the mixture resembles coarse crumbs. -
Step 3
Gradually add 2 tablespoons of cold water, pulsing until the dough just begins to come together. Add the remaining tablespoon of water only if needed for dough to form a ball. Do not overmix. -
Step 4
Turn the dough out onto a lightly floured surface and gently form it into a disc. Wrap in plastic wrap and refrigerate for at least 30 minutes. -
Step 5
Preheat oven to 350°F (175°C). Line a baking sheet with parchment paper. -
Step 6
Roll out the chilled dough very thinly, about 1/16 inch thick. Cut into desired cracker shapes using a knife or cookie cutters. -
Step 7
Transfer the crackers to the prepared baking sheet. Brush lightly with olive oil and sprinkle with additional kosher salt. -
Step 8
Bake for 10-12 minutes, or until golden brown and crispy. Let cool completely on a wire rack.
Important Information
Nutrition Facts (Per Serving)
It is important to consider this information as approximate and not to use it as definitive health advice.
Allergy Information
Please check ingredients for potential allergens and consult a health professional if in doubt.